Injection molding entails injecting molten plastic into a mold for it to cool and form a particular object. The molten plastic is introduced using an injection machine, flows through a sprue and runners to finally get to the gate. A gate is an inlet that allows molten plastic to flow into the cavity of the mold.
The structural features of a gate influence the amount, pressure, and temperature of the molten plastic that enters a mold. All these parameters affect the final outcome of the injection molding process. Therefore, due to their effect, there are different types of gates used to achieve different molding objectives. Here is a look at some of them.
Source: knowledge.autodesk.com
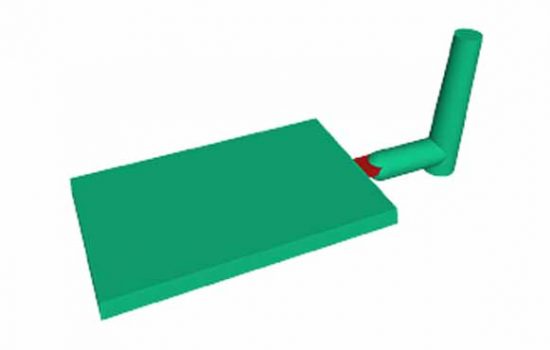
Edge gates are named after their position on a mold as they are located along the edges/ sides. They are a versatile type of gate and are ideal for a wide variety of applications. They tend to have a large rectangular cross-sectional area and can be modified more easily than most valves.
There are two other variations of edge gates named fan gates and tab gates. Fan gates are located along the sides of a mold and are usually wider than the runner leading up to them. As a result, they allow more molten plastic into the mold. This makes them suitable for molding large parts.
In contrast, tab gates have a consistent wall thickness with the runner. Unlike fan gates, they have higher shear heating due to their narrow dimensions. However, their design makes it possible to absorb the shear stress in the gate as opposed to it being transferred to the part during molding. They are best used when molding flat or thin parts.
Source: www.basilius.com
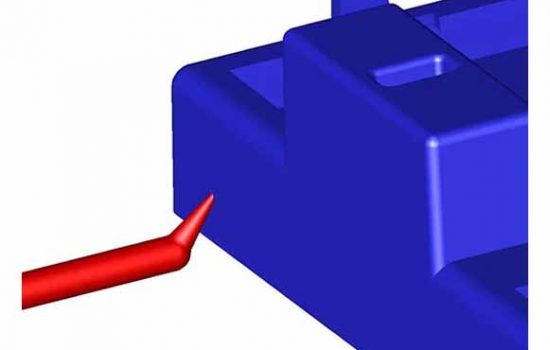
A tunnel gate is located below the mold parting line. This allows for automatic trimming during ejection of the part. In terms of dimensions, this type of gate is usually narrow making it a high-shear gate that allows a limited amount of molten plastic into the mold cavity. As such, tunnel gates are only efficient when used for molding small parts. Attempting to use them for larger parts would result in unnecessarily long cycle times and poor finishes due to sustained shear heating.
Pros:
The narrow dimensions make it possible to use tunnel gates for molds with multiple cavities as they do not take up much space
Their placement below the part line makes it easier to conceal any blemish marks the gate may leave on the part

source: www.basilius.com
A cashew gate is placed below the part line and is, therefore, ideal for automatic trimming. It has a unique design whereby it arcs around the part. This nearly eliminates any contact with the part thereby making this a great gate choice if you want to achieve a smooth finish.
The main challenge presented by a cashew gate occurs during ejection of the part. Due to its curved design, it can be difficult to maneuver around it, and this often causes cashew gates to break during ejection. However, the design of the gate can not be modified without taking away its functionality. Instead, it is easier to use removable gate inserts as they are easier to evacuate even if there is a break.
Pros:
Delivers a smooth finish
Source: krusetraining.com
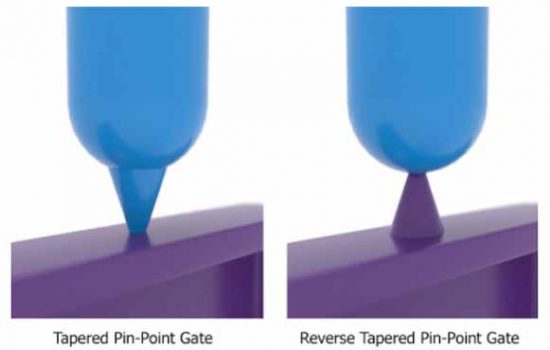
A pinpoint gate is usually placed at the bottom of the part near the ejectors. When the part is complete and begins to be ejected, it detaches from the pinpoint gate with hardly any blemishes. This would thus be an ideal gate for parts that require smooth finishes and automatic trimming.
The average pinpoint gate measures about 0.5 to 2mm. This narrow design makes it suitable for a mold cavity that requires multiple gates because multiple pinpoint gates can be installed at different points without taking up much space. To avoid high shear heating, this type of gate would also work better with fast-flowing resins.
Pros:
Delivers a smooth finish
Allows for installation of multiple gates
Source: knowledge.autodesk.com
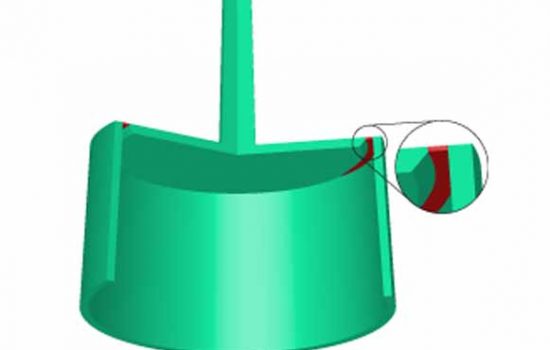
A diaphragm gate is designed to be used for cylindrical parts that are hollow in the middle. They are placed at the center to ensure even distribution of molten plastic flowing into the mold. This placement also reduces shrinkage because plastic parts usually shrink towards their center of gravity. The diaphragm gate being in the middle gives the plastic some stability and only a small degree of shrinkage occurs during cooling.
This type of injection molding gate allows a large amount of molten plastic to flow into a mold. This makes it suitable for molding large parts Further, given as it is located in the hollow part of the mold, a diaphragm gate helps produce parts with little to no blemishes.
Pros:
Reduces shrinkage
Blemish-free parts
Facilitates the even flow of molten plastic
Source: www.moldmakingtechnology.com
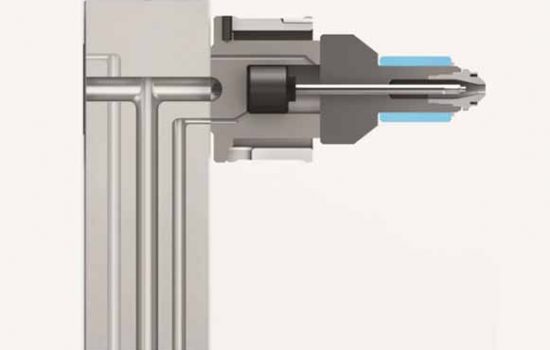
A hot runner mold system is designed to keep the molten plastic liquid until it reaches the mold. It has specific temperature and pressure settings to achieve this. A hot runner valve gate thus maintains the same temperature and pressure conditions as those in the runners. It also has the same width dimensions as the runners.
However, for control purposes, this type of gate has a pin inside it. When the pin is pulled out it allows for molten plastic to flow into the gate. When it is pushed back in, it shuts off the flow of molten plastic from the hot runner mold system. Additionally, pushing the pin in subsequently pushes any plastic left in the gate into the mold. This helps to prevent the settling and accumulation of material in the gate and improves efficiency.
In light of these features, hot runner valve gates are recommended for:
Pros:
Can eliminate the need for trimming
Provides reliable control in the injection process
Multiple gates can be controlled individually at the same time
Reduces wastage of material as everything is dispensed into the mold
It is easy to maintain
Source: www.basilius.com
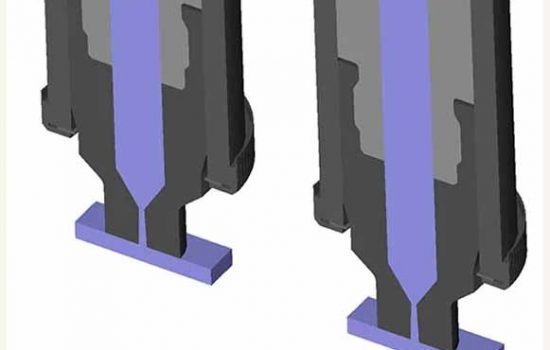
A hot runner thermal gate can also only be applied in a hot runner system. It is placed at the top of the part above the mold parting line. Just like the hot runner valve gate, it maintains a set temperature and pressure to keep the plastic in molten form. Nevertheless, the interior section of this gate has no pin or valve to use as a shut-off mechanism.
The working of a hot runner thermal gate is, therefore, different. The molten plastic flows through it and into the valve. Once the flow stops the molten plastic left in the gate forms a cold slug. This slug is what is referred to as a ‘thermal gate’ as it depends on the pressure and temperature conditions. It acts as a temporary stopper until it is later melted and pushed into the mold when the next batch of molten plastic flows through the gate.
The design and working of the hot runner thermal valve, is dependent on temperature, hence its name. It offers less control compared to a hot runner valve gate but can still be efficient for molds that are not so complex that they require stringent control. A hot runner thermal gate is recommended for molding circular or conical-shaped parts.
Pros:
It offers some control in the molding process
Has lower shear as there is no pin reducing the space in the gate

Source: Pixabay
It is evident that every gate has something different to offer and would be suited for molding different types of parts. As you choose between them, consider:
Trimming – when molten plastic solidifies in the mold, it also solidifies in the gate and may still be attached to the part. Trimming is the process of cutting off such a connection. Manual trimming happens if they detach during ejection while automatic trimming is done by the injection molding machine. Edge gates and pinpoint gates trim manually while the rest trim automatically.
Part shape and finish- each gate is recommended for molding a different part shape and delivers a particular finish. These factors thus require you to play a bit of bingo to find a gate that suits both the shape of the part and your desired surface finish. If this is not possible you can compromise by opting for finishing processes like sanding after the part is molded.
Gate placement- some gates are harder to degate than others due to their placement. Some placement may also result in more blemishes than others.
Gate size- overly small gates have high shear heating rates and can inadvertently increase flow pressure. High pressure would cause the gate to wear out fast and could inflict imperfections on the part.
Choosing the right gate could help keep your production costs in check and improves your cycle times. The right gate type can also make the difference between realizing perfect molds versus defective ones. For best results, it is advisable to seek the services of a professional injection molding manufacturer that is well-experienced and can advise you on your gate options.
+86-755-8524 1121
marketing@rydtooling.com
No. 2, HongKan 1st Road, YanChuan Community, YanLuo Street, BaoAn District, ShenZhen City, China. Post Code 518105.
Subscribe to our newsletter to get manufacturing news and updates!
